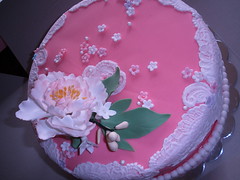
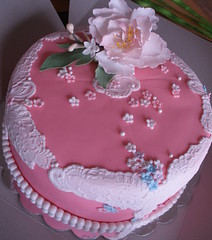
翠羽丹霞
莫辜负四围香稻,万顷晴沙,九夏芙蓉,三春杨柳忙了一周为bridal shower 做了个蛋糕,很有春天的气息。都打包了才想起来应留下倩影存念,又匆匆打开拍照,手机拍的效果不那么好看个大概吧。


翻糖做的装饰,糕体是结婚蛋糕常用的白蛋糕
在做这个蛋糕前考虑了很久,用什么样的糕体,怎样装饰没有主意。我的烘焙本事就烤点戚风,卷点瑞士卷还可以啦,要正正规规地做那就有很多具体问题了。眼看混不过去了,才下决心,花工夫了。现将过程一一录下以供切磋。
一 先说蛋糕,我们东方人喜欢的戚风,海棉是不行啦,太松软,太轻柔,承收不了层层叠加,和装饰品的相压(翻糖很重地说)。不甘心,到处搜寻希望能找到一例戚风配翻糖的组合,没找到。看来戚风还是配鲜奶油,或奶油最好了。只好另找配方了,当然首先想到的是请教我的糕点偶像爱厨MM啦,找到她做结婚蛋糕的篇章仔细读,很是喜欢用水果干做的蛋糕。后来考虑到组装蛋糕要刷一道朗姆酒,而有的老美不让孩子沾那怕是半滴酒,即便是糕点里用的也很介意。我很是想不通,他们烹菜的很多SAUCE里都会用到酒,如意大利菜,难道不吃菜了?小时吃饭时坐父亲旁,每次他喝酒就用筷子沾一滴让我尝,现在我是有点量但从不多喝。回国时见有的家长要孩子尝尝这酒那酒的,那孩子们也没见就成酒鬼的。当然这都是牢骚话,还是少给自己找事,另打主意好啦。
美国人民喜欢的蛋糕据称巧克力蛋糕排第一,红箩卜蛋糕第二。巧克利蛋糕太甜,至于多少糖才既不甜又不苦,不知道了;还有颜色太深,不知会不会影响装饰效果;再有就是喜庆蛋糕切出来是黑黑的有没有觉得怪怪的。从来没有想试过红箩卜蛋糕,红箩卜在我心中一直是尊父母命为了健康吃的东西。排第一第二的被否了,那就是排第三的白蛋糕了。白蛋糕是传统的婚礼蛋糕,白色是婚礼的颜色,易装饰,蛋糕味道也还不错。既是传统,那就是多数人都能接受的,于是糕体就确定为白蛋糕。
这是从网上来的方子,为了便于记忆,又叫做1234蛋糕,没作任何改动,我用一个方子的量做一个10寸圆形蛋糕,共做了两个,削平整后夹上夹馅作糕体。烤时为了均匀受热,我用了凉水浸泡过的烤带环裹烤盘,为了保持糕体的白色加了一个底盘,密切观察顶上,在快要上色时加盖一张锡纸。我的炉火大,我的烤温是325度,时间用了50-55分钟。我会在下个蛋糕篇里(喜上眉梢蛋糕)附上中文版。
(http://www.wedding-cakes-for-you.com/whiteweddingcakerecipe.html)
Makes two layers each 8 or 9 inch round cakes
Preheat oven to 350 degrees
Ingredients
- 1 cup unsalted butter (2 sticks at room temperature)
- 2 cups granulated sugar
- 3 cups sifted all-purpose flour
- 4 eggs (separated)
- 1 cup milk (orange juice if making the orange cake)
- 1 Tablespoon baking powder
- 1/2 teaspoon salt
- 1 teaspoon vanilla extract
- For lemon cake add-zest of 2 lemons
- For the orange version add zest of 2 oranges
Sift together flour, baking powder, and salt. Set aside
In the large bowl of an electric mixer beat the butter until soft and smooth. Add the sugar and beat until light and smooth. Add egg yolks, one at a time, beating after each addition. Stop the mixer and scrape down the sides of the bowl and the beaters several times.
With the mixer on low speed, alternately add the flour mixture and milk, beginning and ending with flour. Stir in the vanilla. At this point you may add flavoring touches if desired. (orange zest, lemon zest, almond extract))
In another bowl, with a clean beater, beat the egg whites until stiff but not dry. (pictured) Stir about 1/2 cup of whites into the batter to lighten it, then fold in remaining whites in several additions.
Divide the batter evenly between the pans. Smooth the batter level, then spread it slightly from the center to the edges.
Bake in the preheated oven for 30-35 minutes, or just until the tops are springy or a cake tester comes out clean.
Cool the cakes in their pans on a rack for 10 minutes. Invert the cakes onto racks.
二 夹馅, 也是为了讨好大众口味选用了经典的 pastry cream
http://www.wedding-cakes-for-you.com/pastry-cream-recipe.html
A Luscious Pastry Cream Recipe
you will need a 2 1/2 quart heavy bottomed pan, a whisk, sieve and a small mixing bowl and plastic wrap.
Pastry cream can be made ahead and refrigerated, covered for a week.
Ingredients
- 2/3 cup granulated sugar
- 2 Tablespoons cornstarch
- 2 tablespoons all purpose flour
- pinch of salt
- 4 large egg yolks or 2 whole eggs
- 2 cups milk
- 1 vanilla bean or 2 teaspoons of vanilla extract
- 2 Tablespoons unsalted butter
Method
On a piece of plastic wrap , or in a small bowl, combine the sugar, cornstarch, flour and salt. In a saucepan combine and whisk together the egg yolks and milk, or whole eggs if you are using them.
Gather the corners of the plastic wrap, or the bowl and pick up the starch mixture, pour it on top of the eggs and milk and whisk well to be sure that all of the cornstarch and flour are dissolved.
Add the vanilla bean. (if using the extract add it at the end of the recipe.
Set the pan over moderate heat and cook the custard for about 12 minutes, until thickened and brought to a boil. To do this stir on and off for the first 5 minutes, then stir constantly for 7 minutes longer until the cream really thickens and reaches a boil.
Remove pan from the heat. The cream is done when smooth and thick enough to leave a clearly defined line when you draw your finger through the cream coating the back of the spoon.
Remove the vanilla bean, rinse it, and set it aside to re-use. If you are using extract instead of the bean add it now. Add the butter and whisk until melted and blended in.
Pour the cream through a sieve into a bowl. Stir in any additional flavoring if using it. To prevent a film from forming on top of the cream, press a piece of plastic wrap onto the surface. Cool cover and refrigerate until ready to use.
三 ICING 就是在装饰前通体摸一道,打底的一层我用的是FRANCH BUTTER CREAM ICING
Ingredients
1) Unsalted Butter:250g
2)
3)
4) Whipping
5)
6)
Method
1) beat the butter until soft and smooth.
2) combine and whisk 2,3,4,5 in a pan
3) Set the pan over low heat and cook and stir constantly until the really thickens or reaches 80 degree
3) Remove the pan from the heat ,and put the pan over another pan of cold water waitting for cooling
4) pour 3 into 1 and whisk
5) add food flavor and whisk
四 装饰 这到是我自行设计,自行施工来的结果还算满意
1)将蛋糕拦腰横切,两个蛋糕共切得四片
2)纸盘做的底盘中央抹一点点夹馅后放上一片蛋糕。摸这点点夹馅是为了粘住蛋糕,不让它在底盘滑动
3)在蛋糕片上均匀地抹上三份之一的夹馅,再放上一片蛋糕片
4)再在蛋糕片上均匀地抹上三份之一的夹馅,再放上一片蛋糕片
5)再在蛋糕片上均匀地抹上三份之一的夹馅,再放上一片蛋糕片,这样一个四片蛋糕三层夹馅的蛋糕体就堆砌而成
6)待蛋糕沉降稳定后(约一小时)将糕通体抹上ICING,均匀,平滑(这要一点点技术)
7)等蛋糕表面的ICING稍干后(用手轻摸不粘手,约一小时后)就可以盖翻糖皮了
8)将等量的FONDANT,和GUM PAST揉匀,再加适量颜色揉匀成可用的翻糖
9)将揉好的翻糖赶成厚度适当,大小适当的圆形糖皮,
10)将糖皮盖在蛋糕上,仔细调整脚边,切除多余糖皮,仔细平整顶面,侧面
11)侧面贴上翻糖蕾丝,脚边线粘上翻糖珍珠,顶上放翻糖牡丹枝,粘上小碎花撒
这样就成了!


